注:以往届 AI 基础作业为资料、采用任务驱动型方法进行学习
作业内容:
阅读并理解代码 修改 np_mnist_template.py,更改 loss 函数、网络结构、激活函数、完成训练 MLP (多层感知机,Multilayer Perception)网络 以识别手写数字 MNIST(modified national institute of standards and technology)数据集 numpy 数值调用库(相当于#include)
使用np.array以支持矢量化运算如 np.array[1,2]+np.array[3,4]
1 2 3 4 5 X=np.array([0 ,0 ,1 ],[0 ,1 ,1 ],[1 ,0 ,1 ],[1 ,1 ,1 ]) y=np.array([0 ],[1 ],[1 ],[1 ])
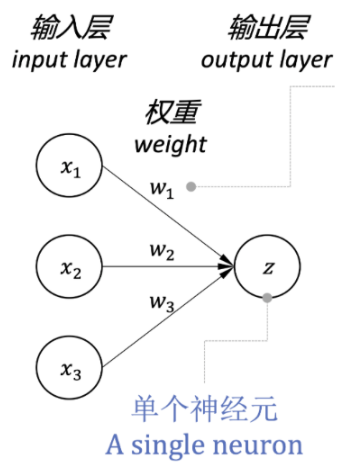
神经元模型
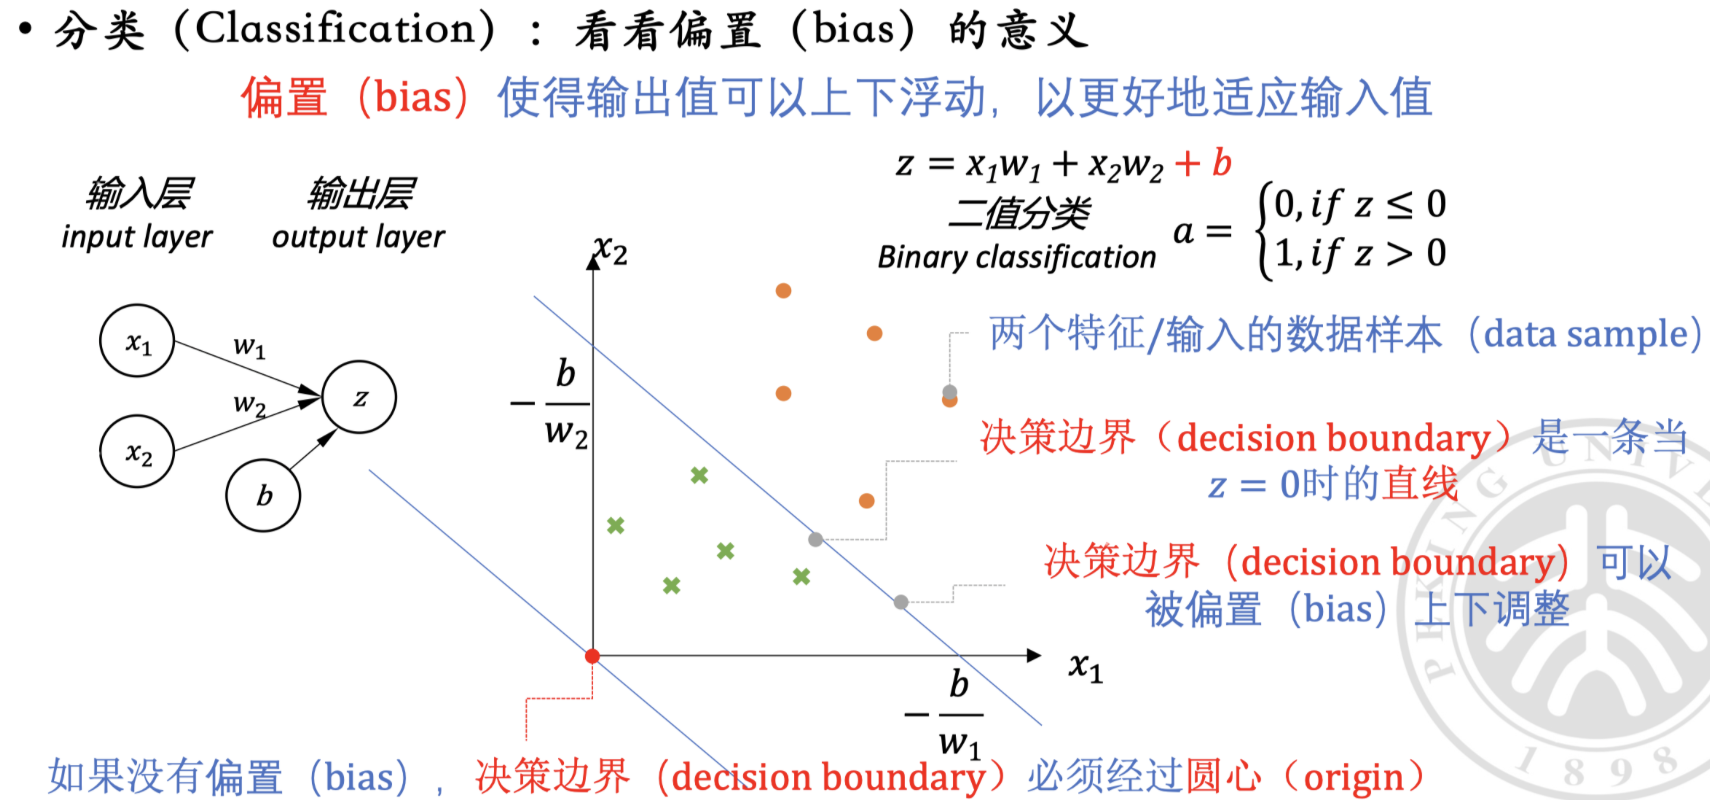
关于偏置
定义激活函数及其导数
1
2
3
4
5
6
7
8
9
10
def sigmoid (x ): ''' sigmoid 函数 ''' return 1. /(1. +np.exp(-x)) def sigmoid_prime (x ): ''' sigmoid 函数导数 ''' return sigmoid(x)*(1. -sigmoid(x))
初始化神经网络参数–填充随机数的矩阵
1
2
3
4
5
6
7
8
9
10
11
12
13
def getweights (shape=( ): ''' 生成随机权重矩阵 ''' np.random.seed(seed=0 ) return np.random.normal(loc=0.0 ,scale=0.001 ,size=shape,)
定义网络结构
首先定义构造函数(初始化方法)
1 2 3 4 5 6 7 8 9 10 11 12 13 14 15 def __init__ (self,lr=0.01 ): ''' 初始化网络结构 ''' self .W1=get_weights((3 ,4 )) self .b1=get_weights((4 )) self .W2=get_weights((4 ,1 )) self .b2=get_weights(1 ) self .lr=lr
接下来定义实现传播算法
1 def backward (self,X_batch,y_batch ):
反向传播算法
结束对象,最后主函数
1 2 3 4 5 if __name__=="__main__" : net= Network(lr=10 ) for i in range (100 ): net.backward(X,y)
此处提到batch即一次训练送进去的数据,此处为4也即batch size(batch:批,次)
1 def backward (self,X_batch,y_batch ):
1 2 3 4 5 6 7 8 9 10 11 12 13 14 15 16 17 18 19 20 21 22 23 24 25 26 27 28 29 30 31 32 33 34 35 反向传播算法 ``` batch_size=0 batch_loss=0 batch_acc=0 self .grads_W2=np.zeros_like(self .W2)self .grads_b2=np.zeros_like(self .b2)self .grads.W1=np.zeros_like(self .W1)self .grads_b1=np.zeros_like(self .b1)self .grads_W2/=batch_sizeself .grads_b2/=batch_sizeself .grads_W1/=batch_sizeself .grads_b1/=batch_sizebatch_loss/=batch_size batch_acc/=batch_size print ("loss:{} batch_acc{} batch_size{} lr:{}" .format (batch_loss.batch_acc,batch_size,self .lr))self .W2-=self .lr*self .grads_W2self .b2-=self .lr*self .grads_b2self .W1-=self .lr*self .grads_W1self .b1-=self .lr*self .grads_b1
1 2 3 4 5 6 7 8 9 10 11 12 13 14 15 16 17 18 19 20 21 22 23 24 25 26 27 28 29 30 31 32 33 34 35 36 37 38 39 40 41 > 其中字符串格式化语法: > > **语法:**`"模式字符串" .format (变量 1 ,变量 2 ,……)` > > **组件:** > > - `{}`占位符 > - `.format `把变量名按顺序填入占位符 注:zip 打包函数:**`zip (X_batch,y_batch)`把两个序列对应的元素逐一打包 ```python for x,y in zip (X_batch,y_batch): z1=np.matmul(x,self .W1)+self .b1 a1=sigmoid(z1) z2=np.matmul(a1,self .W2)+self .b2 a2=sigmoid(z2) self .grads_W2+=np.array([a1*delta_L]).T self .grads_b2+=delta_L self .grads_w1+=np.matmul(np.array([x]).T,[delta_l]) self .grads_b1+=delta_l batch_size+=1 batch_loss+=loss batch_acc+=1 if (y==(1 if a2>0.5 else 0 )) else 0
…